
Posts from the ‘Uncategorized’ Category


This past weekend I had the opportunity to take a chair design class with Jeff Miller who came to speak at our Cumberland Furniture Guild meeting.
This was a condensed version of Jeff’s normal class, but we had the opportunity to explore design ideas by sketching, small scale modeling, and full scale mock ups. I worked on a variation of my bent lounge chair.
Most of the concepts Jeff discussed were really not all that revolutionary to me, but perhaps the biggest takeaway was that design is a skill that can be cultivated like any other with practice. It’s tough to form new habits, but putting more effort into refining my designs before construction begins is something I hope to achieve.
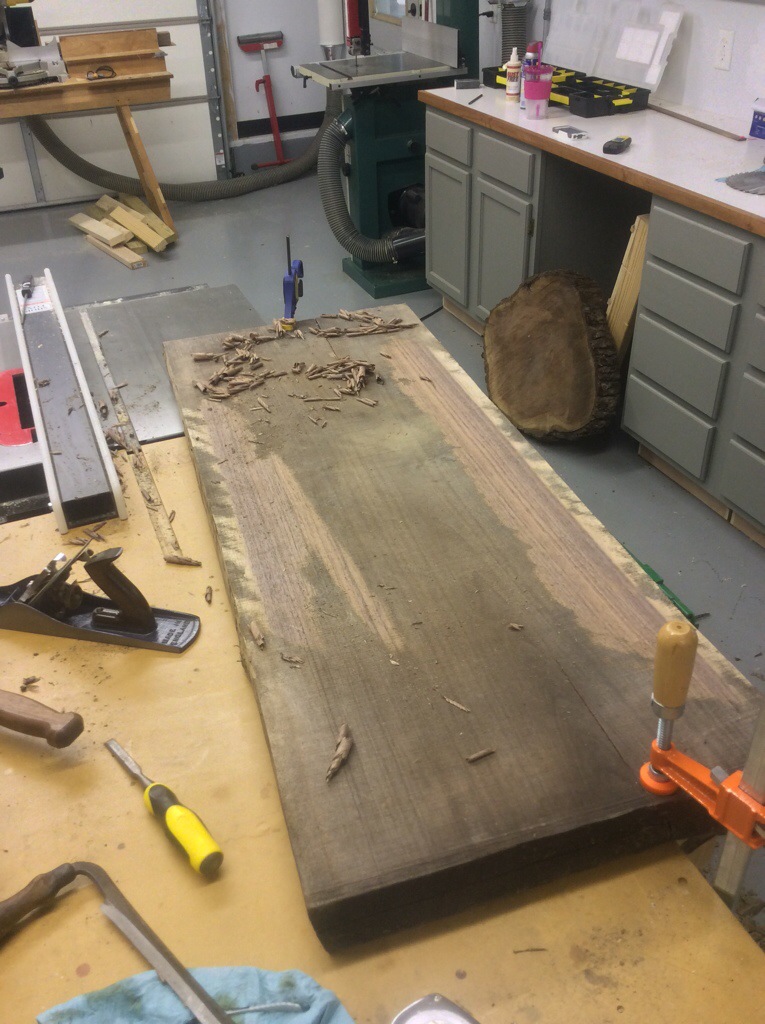
In our family, my wife is the hoarder and I am the purger. So my wife came back from helping her mother clean out some stuff from her rental property with this huge plank that was all weathered and gray. I’m thinking…..great, what is this piece of firewood that I’m going to have to eventually do something with. Just out of curiosity I took a hand plane and knocked off the surface and to my delightful surprise…..quarter sawn walnut! This plank is about 49″ x 18″ x 3″. Unfortunately this was cut from the dead center of the tree and still has the pith in it. Even so, after I rip out the pith, I should net a 6 inch and an 8 inch by 3 inch thick plank of perfectly quarter sawn material. Oh the possibilities!
 Cleaning up the face of a plank of walnut for a “bourbon” cabinet to keep some fine Tennessee (maybe Kentucky) bourbon. The birch ply veneer cores are completed and on the bench in the background.

Resawing an 11″ wide chunk of walnut. Good thing I did a practice cut before cutting into it and decided that my current blade was a little to dull and causing a bit of drift. Luckily a had a good Timberwolf 3/4″ resaw blade on hand. After a few tense moments everything turned out sweetly!

It’s been a long time since the last post on the trestle mostly becuase the majority of the progress has been shaping, sanding, and pre-finishing. Oh, and also becuase a new born makes it a smidge harder to get into the shop. But none the less, the last couple weeks have been fruitful and I’m beginning to feel like I’m turning the corner which is a good thing becuase there are still at least two more projects I want to complete before a show in November.
After my sanding regiment I glued and pegged my loose tennons into the trestle uprights followed by pre-finishing all my components. Next, I assembled each of my end sub-assemblies with draw bored tennons. I found a large pencil sharpener is excellent for tapering the end of the dowels.

Finally, I did the big glue-up yesterday and got my through tennons wedged with some small bits of maple.

I still need to shape, sand, and finish the upper stretchers. Those were a mid-stream design addition but overall the base is nearly complete so I started milling my boards for the top.

Today was the last day of class in the morning. My priority was to get my bent lamination out of the jig and begin to fit and shape it. Due to the layout of my T nuts I wasn’t able to get as dramatic curves as I was hoping for but I think it turned out well none the less.


After some final sanding I attached the back to the chair. I plan on plugging the screw holes with some walnut plugs but I think I’m going to finish both surfaces where they mate with at least one coat of oil.
Lastly, I cut a seat bottom out of some 1/2 inch birch ply. This will eventually become upholstered, but this is not within my realm of expertise so I will leave that to the wife. I think I probably got another hour or two of final sanding and then a couple coats of oil and I will post it as a finished project.

The first order of business for today was cutting and fitting the back rail. After getting the other three sides clamped together in a reasonably sturdy assembly, I took a rough measurement and cut the piece long and began sneaking up on the fit until I thought it was reasonably close then I cut the mortises in the ends with the Domino.
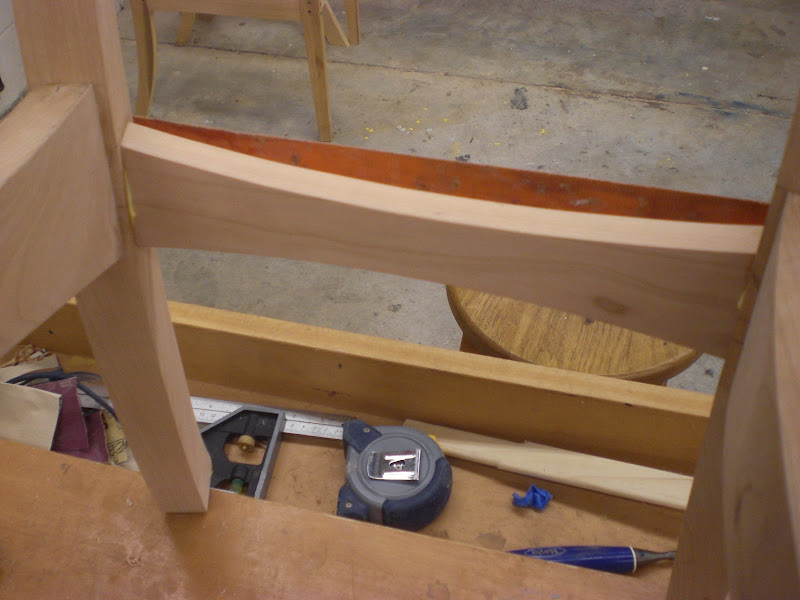
Then came the always stressful glue up. Everything went together pretty well and I was reasonably pleased with all the joints.

Next I unclamped my bent lamination back rest and began to fit it. I the arc of the lamination did not meet the legs perfectly so I had to use my block plane and bevel the outer edges of the top of the legs.

After getting things fitting pretty good I marked, drilled and counter sunk holes for the T-nuts and screws that will hold the back rest on. I had to trim the the bolts so they didn’t protrude from the back rest and poke through my outer veneer layer during final assembly.


Once this was complete I went back to the lamination jig to glue on the final layer that will cover the T-nuts.
Tomorrow is the last day of class. I’m going to get my back rest cut to shape and sanded. Probably won’t get to a seat this week, but the instructor had one he made so I borrowed it to see how it looked.

Not a whole lot of visual activity today. It was mostly a day of sanding and a couple glue ups. Just one of those days where you put the iPod on and let your mind wander as you go through the monotony of hand sanding all the parts before the glue up. Except I forgot mine today so I just had to sit there and listen to the swish swish swish. Once sanded, I glued up both sides of the chair as sub-assemblies. While these were drying I finished shaping and sanding my front rail. I’m particularly proud of my grain selection on the front rail since the grain flow really accentuates the lower curve. I did have one mistake today. While cutting the mortises for the back rail I wasn’t paying attention and cut the mortise on the wrong side of the leg. Luckily, it was where the side rail intersects the back leg so it will be hidden. I just glued in a tennon and trimmed it flush after the glue dried.

At the end of the day I got everything mocked up and was able to take a look.

Tomorrow I need to fit my back rail since this is a bit of a fit and check operation once I have everything mocked now. Then I will be ready to apply the back rest.
This week I’m on vacation and taking a chair making class at the Appalachian Center for Craft which is a satellite campus of Tennessee Tech University where I got my undergraduate degree in engineering and am currently working on a masters of engineering. Every summer, the craft center offers several, week long workshops in all of their offered mediums. So this year I decided to commit to attending a class and not letting life get in the way.
The class is based on a modern dining chair. This is one project that I’ve avoided to this point as I am still a bit intimidated by the angled joinery and overall design concepts of chairs. The class is being taught by Steve Tengelsen, who is a former artist in residence at the craft center and is currently a furniture maker in Asheville, NC. The class is going to focus on basic machinery techniques to to handle curved and angled surfaces along with the structural and comfort aspects of the chair. Surprisingly most of the chair will not be template based. He did have one template for the back legs and even that was just a rough jumping off point.
Tonight was mainly orientation and discussion around Steve’s design progression on how he landed at the particular design for the class. I took a couple of shots of the various design progressions. He actually brought two different variations on the design. You can see that the first couple of iterations are simple dimensional lumber mock-ups to get the basic dimensions.


I can’t wait to get into the shop tomorrow. The craft center has an amazing array of equipment. I will try and get some pictures of this stuff throughout the week.
Stay tuned…. hopefully I’ll have one chair down in five days and 3 to go! (or 5 or 7?)
At this point in my woodworking journey I have been delving more and more into hand tools and frankly falling in love with the sense of craftsmanship and personal connection you have with the piece. That being said, I recently decided to test my theory that with a little practice I could hand cut dovetails more quickly than what it took to setup test, adjust, and cut machine cut dovetails with my PC jig. On top of that, it should be much cleaner and much quieter. So I committed myself to practicing on some scraps every couple of days when I could get some time. I’ve been blogging about this over at Lumberjocks http://lumberjocks.com/doorslammer/blog/series/2315. Up until this point I’ve been using a $25 Crown gentleman’s saw which has worked well and I’ve been fairly successful with it, but I felt like with the straight handle you were never quite sure if you held it the same way every time and the angle of my wrist while sawing felt a bit awkward. So I needed a block plane for another project and have been pining over the Lie-Nielsen low angle for at least a year now so I took the plunge and placed the order. While I was at it I decided I should save on some shipping (all $12 of it) and I ordered the 15 tpi dovetail saw as well.
 I honed the block plane and have been using it regularly for some of my other projects. I’m quite pleased with it and it’s definitely lived up to the hype. I’ve made some obligatory cuts with the saw, but have yet to cut and dovetails with it, but I can already tell the difference in the balance and ease in which this saw tracks down the line. I’m planning a end table project that should really put this thing to work. With tools like this, I think my hand tool evolution can only continue to build.

