
The last several weeks I have been working on getting ready for my first local art show which is coming up next weekend. This is an annual event where local artists display and sell there work. I made it a personal goal to be part of this show this year and worked really hard to get here. I’m a little nervous about opening myself up to the public scrutiny, but also about having to stand there all day and interact with people since I’m a bit of a social leper. What can I say, I’m an engineer.
In order to get ready, I had to do some minor touch ups on some completed pieces and print out some write ups about each piece and a price list, so that’s what I’ve been doing most of the day today. A couple weeks ago I spent a few hours and made these two business card holders out of some scrap walnut and spalted maple.

I also decided to make a couple pedestals to elevate my dining chair and end table pieces. These were pretty quick, just MDF and some paint!

So I think I’m as ready as I can be at this point. Hopefully I’ll sell something and have a little more tool money.
Today was the last day of class in the morning. My priority was to get my bent lamination out of the jig and begin to fit and shape it. Due to the layout of my T nuts I wasn’t able to get as dramatic curves as I was hoping for but I think it turned out well none the less.


After some final sanding I attached the back to the chair. I plan on plugging the screw holes with some walnut plugs but I think I’m going to finish both surfaces where they mate with at least one coat of oil.
Lastly, I cut a seat bottom out of some 1/2 inch birch ply. This will eventually become upholstered, but this is not within my realm of expertise so I will leave that to the wife. I think I probably got another hour or two of final sanding and then a couple coats of oil and I will post it as a finished project.

The first order of business for today was cutting and fitting the back rail. After getting the other three sides clamped together in a reasonably sturdy assembly, I took a rough measurement and cut the piece long and began sneaking up on the fit until I thought it was reasonably close then I cut the mortises in the ends with the Domino.
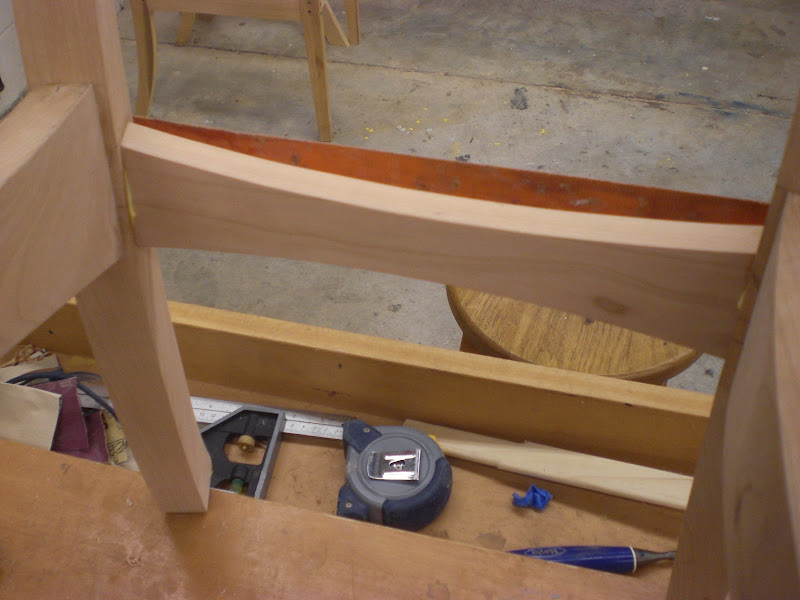
Then came the always stressful glue up. Everything went together pretty well and I was reasonably pleased with all the joints.

Next I unclamped my bent lamination back rest and began to fit it. I the arc of the lamination did not meet the legs perfectly so I had to use my block plane and bevel the outer edges of the top of the legs.

After getting things fitting pretty good I marked, drilled and counter sunk holes for the T-nuts and screws that will hold the back rest on. I had to trim the the bolts so they didn’t protrude from the back rest and poke through my outer veneer layer during final assembly.


Once this was complete I went back to the lamination jig to glue on the final layer that will cover the T-nuts.
Tomorrow is the last day of class. I’m going to get my back rest cut to shape and sanded. Probably won’t get to a seat this week, but the instructor had one he made so I borrowed it to see how it looked.

Not a whole lot of visual activity today. It was mostly a day of sanding and a couple glue ups. Just one of those days where you put the iPod on and let your mind wander as you go through the monotony of hand sanding all the parts before the glue up. Except I forgot mine today so I just had to sit there and listen to the swish swish swish. Once sanded, I glued up both sides of the chair as sub-assemblies. While these were drying I finished shaping and sanding my front rail. I’m particularly proud of my grain selection on the front rail since the grain flow really accentuates the lower curve. I did have one mistake today. While cutting the mortises for the back rail I wasn’t paying attention and cut the mortise on the wrong side of the leg. Luckily, it was where the side rail intersects the back leg so it will be hidden. I just glued in a tennon and trimmed it flush after the glue dried.

At the end of the day I got everything mocked up and was able to take a look.

Tomorrow I need to fit my back rail since this is a bit of a fit and check operation once I have everything mocked now. Then I will be ready to apply the back rest.
This morning we started by gluing up a bent lamination that will become our chair backs. What a mess! It’s funny how well yellow glue acts as a lubricant until it dries. All those layers really wanted to squirt loose until the clamping pressure was equal.

After that it was more work on roughing out the front legs and front rail and cutting all the mortises using the Festool Domino.


The remainder of the day I spent cutting the decorative curves out of all the rail pieces that were previously rough cut in 8/4 stock. After laying out the curves on the top edge of the rail pieces they were cut out on the band saw and then cleaned up with the horizontal belt sander and oscillating spindle sander. These two machines were key in this process. They made it so fast and easy to clean up the rough band sawn surfaces.


At the end of the day, I had two sides mocked up and ready for some final sanding and glue up tomorrow.

Oh, one more thing. I was looking around a little at lunch and found a couple of these great Krenov style planes that I guess some of the students made. I think I may have to find some time to take these for a test drive tomorrow.

Today started off a bit slow. We began by choosing our lumber. We had the option between walnut and cherry so I chose a nice piece of cherry since it seems like I always work in walnut. Next, we traced the template for the back legs onto one half of our stock and rough cut and jointed an edge to create the plane for the back leg to side rail joint.

We got to use the 16″ Powermatic jointer after some adjustment to get the in-feed and out-feed table parallel. This was a bit disappointing.

Then we re-sawed about 1/2 inch of stock off and planed it smooth to get to our finished thickness of about 1-1/4″

After, I finished rough cutting my legs at the bandsaw and cleaned up the front of the leg on the huge horizontal sander.

The back of the legs have almost a full round over at the bottom and tapering to about a 3/8″ radius at the top. We accomplished this with spokeshaves and then some hand sanding. This was truly the highlight of my day. I’ve never really used one before and I can definitely say that this tool will be moving up a few spots on my wish list. I started by drawing a centerline down the length of the leg and just worked each edge to the line until the radius looked about right.


Next we moved to the side rails and this is where the brain cells really needed to kick in. The back got a 27 deg miter and the front got a 12 deg miter and a 6 deg bevel and each side needed to mirror the other. I spent some considerable time laying out my two rails, double checking my angles and choosing the best grain orientation. I also had to be smart about cutting around some defects. I made the all the cuts on one of the two SawStop table saws. You can also see some rough layout lines for the curves in the rails.

Tomorrow I’ll cut the Domino joinery for the side rail to back leg joints.
Stay tuned….
This week I’m on vacation and taking a chair making class at the Appalachian Center for Craft which is a satellite campus of Tennessee Tech University where I got my undergraduate degree in engineering and am currently working on a masters of engineering. Every summer, the craft center offers several, week long workshops in all of their offered mediums. So this year I decided to commit to attending a class and not letting life get in the way.
The class is based on a modern dining chair. This is one project that I’ve avoided to this point as I am still a bit intimidated by the angled joinery and overall design concepts of chairs. The class is being taught by Steve Tengelsen, who is a former artist in residence at the craft center and is currently a furniture maker in Asheville, NC. The class is going to focus on basic machinery techniques to to handle curved and angled surfaces along with the structural and comfort aspects of the chair. Surprisingly most of the chair will not be template based. He did have one template for the back legs and even that was just a rough jumping off point.
Tonight was mainly orientation and discussion around Steve’s design progression on how he landed at the particular design for the class. I took a couple of shots of the various design progressions. He actually brought two different variations on the design. You can see that the first couple of iterations are simple dimensional lumber mock-ups to get the basic dimensions.


I can’t wait to get into the shop tomorrow. The craft center has an amazing array of equipment. I will try and get some pictures of this stuff throughout the week.
Stay tuned…. hopefully I’ll have one chair down in five days and 3 to go! (or 5 or 7?)
Here’s the start of my latest project. It’s a take on a modern end table. This is my own design but is definitely influenced by the stuff I’ve been looking at and been interested in lately. As usual, I’m going with walnut and using some cherry accents.
I started by milling my stock to dimension and making some bridle joints to form the legs. I formed the bridle joint by using my home made tennoning jig and band saw. Later I added a square cherry peg.


The next step is to add a dovetailed box to house a drawer that will be floated between the legs with either steel or copper standoffs. I’m still a bit undecided on the top. Originally I was thinking of just going with a solid walnut top, but I’ve had thoughts of doing a picture frame with a veneered center. Something’s telling me that less is more in this situation and I should just go with the solid top.
For a while now I’ve been more than a little unhappy with my current shop layout and dust collection setup, but have failed to do much about it since I’ve had some projects that had to get done. My current setup had a run feeding the jointer and table saw, but was done completely out of corrugated flex pipe, so I wanted to replace this with more solid pipe and move my planer near my jointer. This would also solve another problem I have with sharing a pipe between my planer and chop saw. I was always having to switch back and forth between the two and both machines were located behind the table saw which created some space constraints with longer stock or sheet goods. In anticipation of getting a new band saw, I decided it was time to make a change to improve the layout, make some room for the new saw, and hopefully increase the overall efficiency a bit.
It seems like arranging your shop can be one of the most difficult exercises since there are so many constraints on your layout decision. For me, I want my machine area to be compact enough so that I’m not having to move excessively between operations, but still maintain some space to handle longer stock or sheet goods. Another consideration is my dust collector. Right now I have a basic 1.5 HP bag style collector. This machine does a pretty decent job, but I definitely need to limit the length of my runs to maintain maximum efficiency.
I started by replacing my first run to the jointer/planer and a “Y” to the table saw using 4 inch hvac ducting. I decided to run the trunk lines on the floor to reduce the length of the run and to avoid fighting gravity. The downside here of course is I will have to be a little more careful not to step on the pipe. I’m also planning on putting my router table in a extension wing on my table saw side to consolodate space and dust collection so that will “Y” off the table saw line eventually.


The other leg of the system will feed the new band saw and my chop saw. This leg is made from the original PVC system I put together. Here I removed all my other outlet ports and inserted a “Y” for the band saw and continued the run for the chop saw. I was a little concerned about the length of the run to the chop saw, but I think with the addition of more smooth pipe and eliminating several “T”‘s I had in the line I’ve actually improved the efficiency.

 Finally, I went through the entire system and made sure all the joints were well sealed with duct tape. You know your really woodworking when the duct tape comes out!
My sister recently asked me to build a couple of children’s desk for her step daughters. And by recently I talking in woodworking time, so about 3 months ago. Anyway, the goal was to build two matching desks that resembled the old flip top school house desks. The design is really simple and we just chose some knotty pine for the material to match some of their existing kid furniture. The pine was a little a little difficult to work with in the sense that it tended to want to move a bit and and definitely gummed up my table saw and chop saw blades, but on the positive side this stuff was like butter with hand tools so I took the opportunity to break out the hand planes and saws when ever a good opportunity arose.
 I started by routing some 1/4″ mortises into the legs a milled up from some laminated 3/4″ stock. I haven’t yet settled on my chosen method for routing mortise, so I just clamped guide board to the bench and put my leg stock in the vise. This seemed to work just fine.
 Next I cut the tennons on all the rails on the table saw with my homemade tennoning jig and then did some fine tuning at the bench with the chisels and rasp.
 Here are two of the leg sub-assemblies being glued up.
 Both tops were flattened and smoothed by hand after glue up. I did have trouble with one of the two tops. One of the boards I got for the top was extremely cupped when I got it and didn’t notice, or it freaked out when I got it home in the shop. I tried to cut it apart and re-glue, to remove some of the cup which seemed to work, but I still had some twist. Eventually I just decided a new board was well worth the time spent.
 Here’s the final product. Two beautifully simple little desks that should provide years of good service and enjoyment for my new nieces. With a little luck, they should be around for years!

